
Preface: I wrote this series of articles to show how to get excellent results in body work with simple tools. It's intended to be a guide for the novice body worker trying to save money, and covers only surface preparation prior to painting. Not everybody can afford the big air compressor and special tools associated with this kind of work for what may be a one time job. I'm into my third full restoration and sixth paint job, and still prefer to keep it simple. I hope this little piece will help someone because any day I can help someone is a good day for both of us. Click here to see all articles in this series
- John D. Weimer
Jambing
So, you thought 'jamming' was a group of musicians getting together and trying to out play one another and having a good time. Nope! Not when it comes to cars.
'Jambing' a car is somewhat different than 'jamming musicians', and if you call wearing your fingernails down into odd shapes, poking little holes in your fingers and hands, and generally working your fingers to the bone fun, you'll enjoy SANDING JAMB AREAS.
Jamb areas are around door jambs, door edges, the bottom of the hood, the engine bay, and all the places that must be jambed-in (painted) before you shoot the overall color coat. It' a major portion of what that two or three grand you drop on a body shop goes for. Most of what you buy is "grunt" work. The actual color coat paint, hardener, reducer, and clear coat, (if you use a two stage system) costs maybe $400.00, depending on color and paint type, and the painter himself spends only about an hour with your car.
Before that comes, however, all the grunt work.
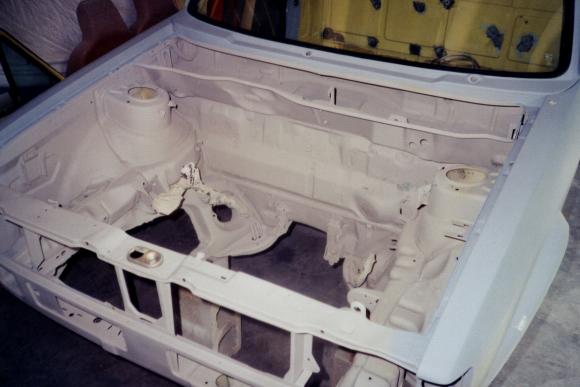
Every nook and cranny you see in this photo--and plenty you can't--has to be sanded before you paint. It is imperative that nothing be missed or the finish coat will not have a solid foundation to bond to, and will begin to peel off in a year or so. It took about six hours to work out the areas you see here. The underside of this hood took about three hours before I was satisfied with it. Nine hours for the engine area alone seems like quite a while, eh?
Well, boys and girls, that's after degreasing and scrubbing all that, sanding the original finish, and priming it to the point you see here. That puts it at no less than eighteen hours multiplied by the body shop rate because most under hood areas easier to work than this one.
How much money can you save by doing it yourself?
Go figure. Wait, there's more.
Sanding Supplies
About all you need for jamb sanding is a couple pieces of 3M # 7447 Scotchbrite pad, some 320 dry paper and maybe a piece of 180 dry paper. Scotchbrite pads seem handier if cut into 3 or 4 pieces.
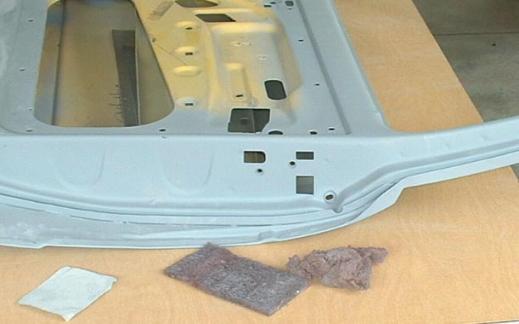
The pieces you see here are 1/3 of a full pad. The waded up "worn out" piece is far from worn out. That stuff never quits working and you can use it until it wears away to nothing. You can get in the tiniest crevice, it cuts fast, and doesn't produce any deep scratches. You can wad it into a 1/4" wide weather-strip channel and have it sanded in a jiffy. Notice the 320 paper looks like a small square. It is actually 1/3 sheet folded in thirds. Whether you're dry or wet sanding the paper is easier to work and control when folded in thirds and you can end up using every bit of the paper when folded this way.
The Scotch-brite alone works well on most surfaces, but when priming into many of these type areas they'll always be some blow out and stick to surfaces in a nearly dry state. You'll feel where they are as soon as the Scotchbrite hits them, they feel kind of like sandpaper.
Grab the 320 give the area a couple of swipes, the nibs are gone, and go over it with the Scotchbrite to retain a uniform surface. If you happen onto a run, you can knock it off quick by finger sanding with the 180 then hit it with the other two.
The Sanding Block
This is so basic that I've never seen it in a painting article, but I'm not assuming everybody knows it.
Standard size sander blocks are sized to the sandpaper. You can measure the paper with the block as in the picture or you can fold the paper in half tear it off and fold those pieces in half again and separate them. In any case one sheet of paper will make four useful pieces. Wet or Dry paper is really tough so you'll mess up now and then. The preferred method is to fold the paper with the abrasive side out, pinch it together as tight as you can then tear it using a sharp edge as shown here.
I use the pieces on the block, (of course), folded in third for hand sanding, and cut a paint stick to the width of a sander block and wrap the paper tightly around it. The stick is a super handy combination of block and hand sanding for small areas or large. It's not quite as accurate as a block sanding on flat areas, but I find it makes wet sanding a lot easier on your hand. I always follow up either method with hand sanding, dry the part, then run over it with a Scotchbrite pad. The Scotchbrite just gets the entire surface uniform while removing a minimum of material.
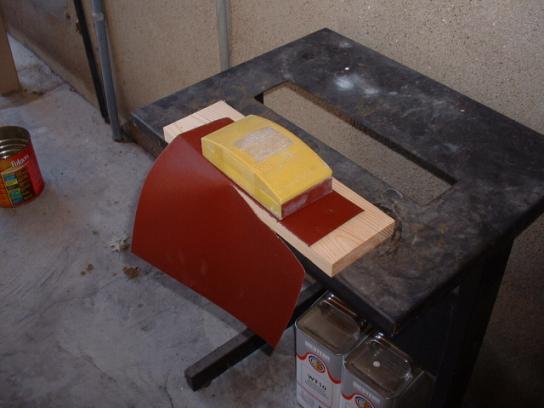
Measuring and cutting paper for your sanding block
Sanding Technique
Keep an eye on your fingers when hand sanding, you may want to start off wearing a latex or nitrile glove to save wear and tear on yourself. I once wore the skin on my fingers so thin I started bleeding right through it before I knew what was happening, put a latex glove on and kept going.
Remember to spot prime any areas where you happen to sand through to metal, let it dry, and Scotchbrite it.
The next step is to wash everything with plain water and powerful stream from a hose nozzle or pressure washer. This gets rid of all sanding dust, abrasives that have worn off the sandpaper, and bugs; especially spiders. Those little devils will take up residence in the tiniest places, so wash them out good, the hardiest ones will run out onto your paint when you start spraying.
I like to wash everything the afternoon before I intend to paint, stand it up against something and let it dry overnight. The next morning I'll turn the doors, hood, etc 90 degrees just in case some water stayed in there somewhere and let them set while I do my masking and prepare to paint.
Pro Tips

A minor point, but usually forgotten. Screw the attaching bolts in wherever they belong before jamming and when you're done they're painted too. If washers are involved set them about like on the lower yellow bolt and they'll get painted on both sides just as a matter of course. What little paint gets on exposed threads is of no matter, and it's easier to clean the bolt than the jamb nut.

Here's a neat trick: Mask the door from the inside while you're outside. It's the only way to get it right. Start at the straightest side and keep working it until you have an arm, then hand, then finger hole at the bottom.

")


talking with a mechanic about this today...
need ideas
regular practice to make it perfect biro
jodoh
Want to leave a comment or ask the owner a question?
Sign in or register a new account — it's free